Top wiring up a light switch Secrets
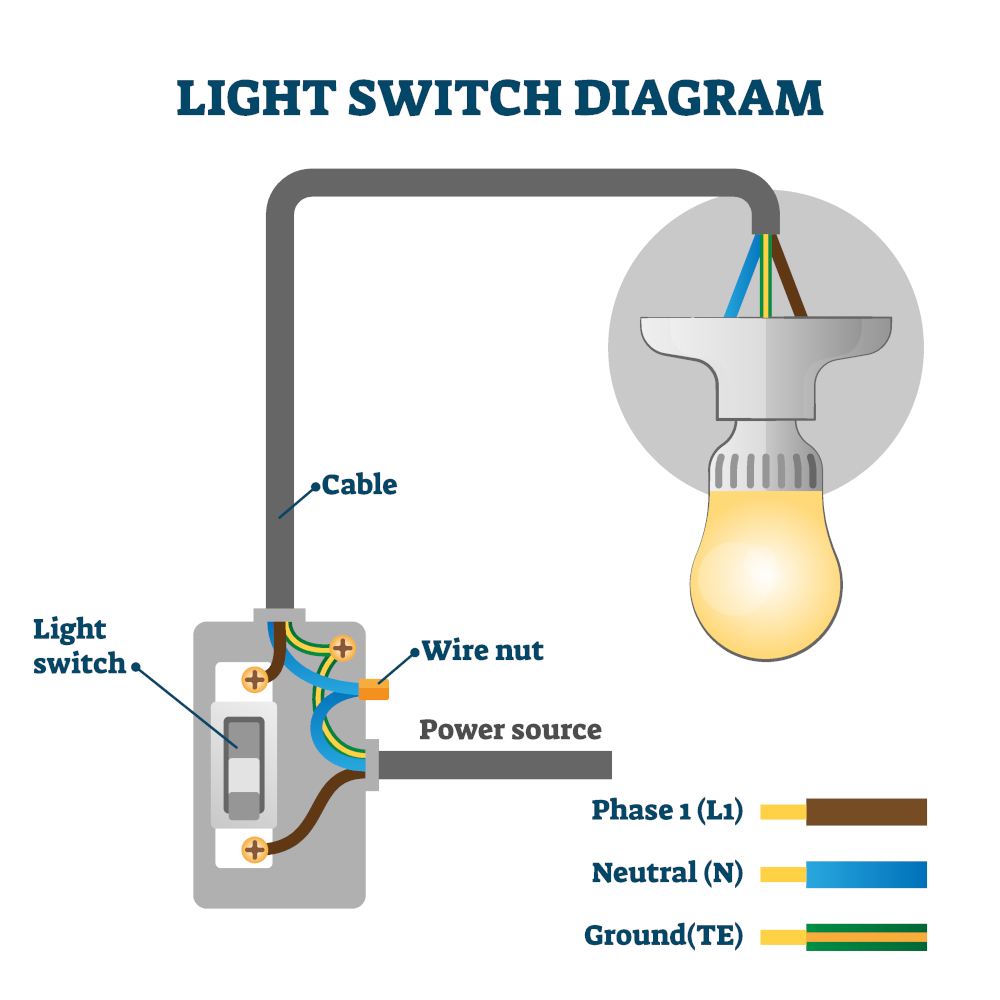
A standard single-pole light switch is the kind where you flip the switch's toggle or paddle up or to change lights on and off. This acquainted switch is in reality defined by hardware providers as well as likewise electrical contractors as a "single-pole light button."
A single-pole switch has 2 brass incurable screws on the side that attach to the electrical circuit's black (" hot") cables. One black wire stems from the source of power (the electric panel) and also the various other mosts likely to several lights.
When the switch in on, power moves with it from the inbound cord to the outgoing cord. When you transform the turn off, it disrupts the circulation of electric energy. Consider it like a drawbridge that autos as well as trucks can cross when it's in positioning however, when open, interrupts the circulation of vehicles. Lots of switches similarly have a eco-friendly grounding screw that affixes to the circuit's bare ground cord for risk-free "grounding" of the button.
Exactly how to Wire a Dimmer Switch Over
A dimmer button is wired similarly as a basic single-pole button, nonetheless the dimmer normally has it's very own wires currently connected to the switch-- so you make use of cable nuts rather than screw terminals. In this illustration, you can see the red-colored "hot lead" cables of the dimmer are affixed to the incoming black wire from the electrical source (the electric panel) in addition to the black cable that mosts likely to the light's black wire which, in this situation, is a white cable that has been taped with black electrical tape to suggest that it functions as a black cord.
Circuitry a One Means Switch
A one approach light switch has 2 terminals which is an typical substantial as COM or C. The usual is for the live wire that provides the input voltage to the button. The different other incurable is kept in mind as L1 as well as likewise is the end result to the light.
When you're circuitry decorative light buttons such as chrome or stainless-steel and so on, you'll locate that the switch will in addition have an L2 terminal which shows it's a two method switch. If you're circuit is only one method, you can forget this incurable in addition to it will still function. This is due to the fact that 2 method buttons can likewise be utilized on one technique circuits. Suppliers don't make ornamental one approach buttons.
Wiring a Two Means Switch
The a lot more preferred light button with two technique altering, which shows you can alter the same lighting fixture from 2 switches that are located in different sides of a space. Two suggests switches have a COM terminal along with L1 and also L2 terminals.
When L1 is off L2 would certainly jump on.
When L1 is on L2 would be off.
There are 2 circuitry alternatives for this:
2 method button circuitry examples
More advanced dimmer buttons like Varilight Eclique (currently called V-Pro Multi-Point Touch) as well as additionally Lightwave have an S incurable rather. The S terminal can just be connected to a matching servant and likewise will not work with a usual 2 means switch. Right here is a wiring circumstances of a Lightwave RF Gen1 dimmer switch revealed from behind:
Intermediate Switch Electric Electrical Wiring
Intermediate changing resembles 2 ways nevertheless permits a third button to be integrated. An circumstances of this would definitely be having one button at the bottom of a staircases, one ahead along with one in the facility. It's not known as 3 means transforming considering that you can furthermore consist of more buttons for 4 way changing or even more.
Intermediate buttons have terminals significant L1, L2, L3 and additionally L4. Look at the layout below that shows just how to suggests a 3 indicates switch:
Intermediate switch electrical circuitry
2 Means Dimming
2 technique dimming permits you to dim a light from 2 areas. You can not take advantage of average rotating dimmer buttons to do this because you might perhaps lower the light to 10% with one dimmer, then walk over to the numerous other dimmer as well as effort to dim the light to listed below 0%. Or vice-versa you could be attempting to brighten the light over 100%. This would certainly create major instability on the circuit, like the time when the ghost busters crossed the beams!
You can have a dimmer button as well as additionally an on/off turn on the exact same. The dimmer will certainly do the dimming as well as both way button will be able to switch it on and off. If you have in fact reduced the lights to 50% the switch will definitely maintain switching it as well as additionally off at that degree until you reduced it once again.
Until reasonably lately 2 means dimming was rather expensive, perhaps done making use of Lutron Rania up until they acquired ceased. With the arrival of Varilight V-Pro multi-point dimmers (officially Eclique) and also Lightwave Smart switches over, this is now easy to do as well as does not cost too much. Varilight requires a combination of master and also slave dimmers for it to work. While the Lightwave Smart collection dimmers can be set using their Application to carry out 2 technique or perhaps 3 means dimming.
Wireless Switches
Wireless switches typically require an added receiver for them to function. The receiver is placed in the ceiling void near to the lights. It receives an RF ( Superhigh frequency) signal from the button to educate the receiver what to do. If you've presently obtained cable televisions ready you can still utilize a cordless switch by ending the cables. Trademark name like Rako as well as Lutron have their very own cordless systems. Lightwave quit their Gen1, Web Link Collection.
Wireless switches utilized to be battery powered, Ener-J have really taken this a action much better with their kinetic buttons. Utilizing the power generated from pushing the button, which is sufficient to send the signal to the receiver. The receiver afterwards switches over the lights in addition to are easily available in dimmable or non dimmable variations, along with a Wi-Fi version for smart phone control. They can either be screwed or adhered to a surface area as well as have actually IP65 ranked variations which are excellent for toilets.
Mobile Phone Dimming
If you intend to regulate your lights from a cellular phone, the most convenient and likewise most affordable means of doing this is with Lightwave. All you need is a master dimmer button, the Lightwave RF Wi-Fi center as well as the Application which is totally free to download and install as well as mount. The new Smart Series lowers LEDs easily as well as additionally gives timer and likewise scene configuration functions. You can similarly manage wise power sockets, heating controls as well as likewise other Lightwave attachments.
Lutron QS Keypad Electric Circuitry
Among the major benefits of using a home automation system over basic dimmer buttons is that you can change those big confusing looking double plate, 3 as well as 4 gang dimmer buttons with trendy looking keypads. Lutron keypads have up to 10 buttons in addition to dim up as well as reduced down. The buttons can be configured to create lights scenes of your choosing. Right here is an instance of an inscribed 5 switch Lutron SeeTouch keypad in satin nickel with black switches.
Lutron QS Seetouch
Once you have actually selected the function of each scene you can get the switches engraved by completing a type and additionally sending back to Lutron, this is contained in the expense of the keypad. You could either have something simple like Scene 1, Scene 2 and more or try something far more daring like 'All On', ' tv Seeing', ' Occasion Time', ' Evaluating' and also 'Erroneous' like in my instance. A scene can be a mix of various illumination circuits that are ready to various dimming levels. ' television Watching' could lower your main LED downlights to 10%, your wall surface area lights to 30%, your cove LED strip lights to 50% in addition to even transform a table light on, all at the touch of one button.
If you're taking into consideration setting up a capacity automation such as Lutron Grafik Eye QS or Energi Savr Node (known as ESN), the matching keypads which are called SeeTouch require to be wired completely in a different way to any one of the basic switches that we have actually discussed. To begin with they require a 24V DC supply which can be taken directly from the Grafik Eye or ESN. The keypads can furthermore take care of digital blinds which are similarly easily offered from Lutron.
Making use of the suggested Lutron control cable which has 2 sets of cables, one pair is for power in addition to the various other set is for signal. Added keypads in addition to various other components can after that be connected from one to the other utilizing the QS Link terminal. You can likewise attach a Grafik Eye QS to an Energi Savr Node as well as also have them both on the exact same system.
The Lutron Grafik Eye is now ceased as it was as well overpriced to stay on top of various other up in addition to coming creative lighting brand names.
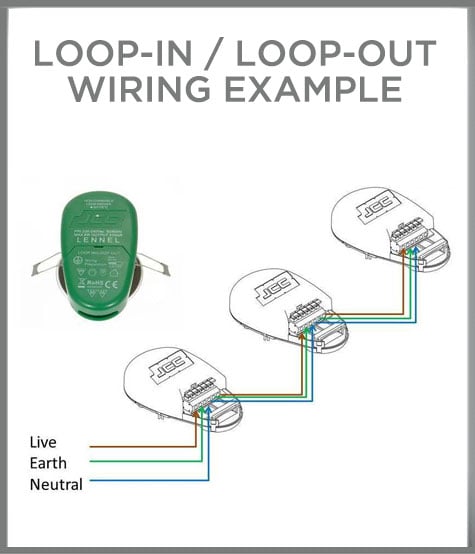
Lighting Circuits-- Loophole In, Loophole Out
The favoured methods of circuitry recessed downlights is taking advantage of the technicality in, technicality out strategy. This is a form of similar wiring that has one cord ( generally twin as well as likewise world 6242Y) having the real-time, neutral along with earth cords knotting in as well as later on out of leach light appropriate. This is an alternate to the traditional junction box system, it makes use of less cable tv as well as additionally is much faster to finish.
Many downlights have a loophole in, technicality out incurable block connected to them. For example the Ansell iCage has the biggest one which was especially created for this kind of wiring. A preferred feature for downlights is push-fit terminals which similarly have loop in, loophole out terminals. Some have them directly linked to the downlight as well as some featured circuitry ports. The picture listed below programs the loop-in, loop-out wiring technique:
loop in, technicality out electrical wiring
When setting up downlights that don't have their very own connection system, numerous installers create their very own by using a Click Flow Connector. With this adapter you wire the smaller sized male adapter right into the downlight and additionally the comparable women adapter right into your loophole in, loophole out circuit. Then you simply plug the downlight right into the circuit as well as also continue the procedure with the complying with ones.
Various other downlights like the Aurora M Collection in addition to Click Ovia Nano are offered with their actual own electric circuitry ports. The male port is already pre-wired right into the downlight so half of the task is currently done for you. An fringe benefit of using Flow Connectors is if the downlight fails you can separate it as well as get it transformed on your own without needing to get an electrical service provider back in to separate it as well as after that reconnect the replacement.
Lights Circuits-- Collection Electrical Electrical Wiring
Collection wiring is mainly used with numerous LED lights that are powered from the exact very same LED driver. It is generally taken advantage of with smaller sized LED downlights or with LED ground lights that are constant present. Among one of the most popular continuous current scores are 350ma or 700ma. This layout listed below shows how it's done:
Collection wiring example
Although a lot of the LED downlights we supply are constant current, they are each offered with their actual own LED vehicle driver with is either directly affixed to them or trails behind them like an old made halogen and likewise low voltage transformer mix. If you're circuitry a keys supply right into each LED car chauffeur individually it would absolutely be classified as the same wiring as well as can be done utilizing the loophole in, technicality out technique. Identical electrical wiring is primarily utilized with consistent voltage lighting things such as LED strip lights.
Wiring a Downlight
If you're updating an existing halogen downlight you'll probably either have keys voltage GU10 or low voltage MR16 (GU5 .3) halogens. Decreased voltage halogens will have a transformer; this will definitely need to be detached as it will definitely no longer be called for. The only reason you would absolutely require to maintain the transformer is if you wanted to utilize MR16 LEDs that operate a/c, this is a much less popular alternative as you require to make sure the existing transformer works with the LEDs as well as additionally if you're lowering them, you'll require to ascertain that the MR16 LED, transformer as well as additionally dimmer button are all suitable. Lots of installers opt for the GU10 or incorporated option as their are much less elements to take into account as well as it usually sets you back much less.
Opening Eliminate Size
If you're changing existing downlights you'll desire your new ones to have a comparable opening removed dimension otherwise you'll either need to make the holes bigger or make them smaller sized (yes I declared smaller) which would certainly involve re-plastering your ceiling as well as re-cutting the holes. Matching the hole dimensions is always a important choice in the option procedure.
Unless particularly mentioned downlights are wired in parallel, downlights are only normally wired in collection when numerous lights are being powered from the exact very same LED licensed operator. Depending upon which sort of downlight you select, you may need to establish stipulations to earth them. Below are 2 examples that clear up exactly how to wire a downlight, one is for a GU10 fire ranked downlight in addition to one more clarifying simply exactly how to wire an incorporated LED downlight, each has it's very own earthing stipulations:
Wiring a Fire Ranked Downlight-- Ansell iCage
The Ansell has really obtained a substantial technicality in, loophole out incurable block that permits 2x 1.5 mm twin in addition to planet cables to wired right into one downlight and right into the complying with one. The iCage is provided with both a GU10 and additionally a GU5 .3 low voltage light holder.
When used with the GU10 light owner, the downlight is secrets voltage as well as also have to be earthed. This is determined as a Training course I thing. If you're making use of the reduced voltage GU5 .3 lamp owner the downlight is classified as Course III and likewise does not need a earth.
Wiring an Integrated LED Downlight - Halers H2 Pro
Some incorporated LED downlights like the market leading Halers H2 Pro from Collingwood Lighting are SELV which represents Safety and security and also protection Additional Low Voltage. This suggests that the voltage of the LED driver is listed below 12V a/c or approximately 30V DC. Voltages listed below 20V can not usually be really felt by the human body as well as additionally are taken into consideration safe.
SELV light installations don't require an planet; they are recognized as Course III built products. The LED licensed operator for the H2 Pro is additionally dual shielded which suggests it has 2 layers of insulation around the online components, this in addition indicates it does not require to be earthed. The DC output voltage is split from the a/c supply voltage.
The H2 check Pro has a real-time in addition to neutral cord coming off the LED vehicle driver, you'll require extra joint or adapter obstructs to wire them. By including a Click Circulation connector you can create your extremely own technicality in, technicality out system as pointed out in the previous loop in, loophole out electric circuitry section.
Wiring a Light Switch
Wireless Switches
Wireless switches usually require an additional receiver for them to work. The receiver is positioned in the ceiling void near to the lights. It receives an RF (Radio Frequency) signal from the switch to tell the receiver what to do. If you've already got wires in place you can still use a wireless switch by terminating the wires. Brands like Rako and Lutron have their own wireless systems. Lightwave discontinued their Gen1, Connect Series.
Wireless switches used to be battery powered, Ener-J have taken this a step further with their kinetic switches. Using the energy generated from pressing the switch, which is enough to send the signal to the receiver. The receiver then switches the lights and are available in dimmable or non dimmable versions, as well as a Wi-Fi version for smart phone control. They can either be screwed or stuck to a surface and have IP65 rated versions which are ideal for bathrooms.
Smart Phone Dimming
If you want to control your lights from a smart phone, the easiest and most cost effective way of doing this is with Lightwave. All you need is a master dimmer switch, the Lightwave RF Wi-Fi hub and the App which is free to download. The new Smart Series dims LEDs effortlessly and provides timer and scene setting functions. You can also control smart power sockets, heating controls and other Lightwave add-ons.
Lutron QS Keypad Wiring
One of the main advantages of using a home automation system over traditional dimmer switches is that you can replace those big clunky looking double plate, three and four gang dimmer switches with trendy looking keypads. Lutron keypads have up to 10 buttons as well as dim up and dim down. The buttons can be programmed to create lighting scenes of your choosing. Here is an example of an engraved 5 button Lutron SeeTouch keypad in satin nickel with black buttons.
Lutron QS Seetouch
Once you’ve decided on the function of each scene you can get the buttons engraved by completing a form and sending back to Lutron, this is included in the price of the keypad. You could either have something simple like Scene 1, Scene 2 etc or try something more adventurous like 'All On', 'TV Watching', 'Party Time', 'Reading' and 'All Off' like in my example. A scene can be a mixture of multiple lighting circuits that are all set to different dimming levels. 'TV Watching' could dim your main LED downlights down to 10%, your wall lights down to 30%, your cove LED strip lights down to 50% and even switch a table lamp on, all at the touch of one button.
If you’re considering installing a full home automation such as Lutron Grafik Eye QS or Energi Savr Node (known as ESN), the corresponding keypads which are known as SeeTouch need to be wired totally differently to any of the traditional switches that we’ve mentioned. Firstly they require a 24V DC supply which can be taken directly from the Grafik Eye or ESN. The keypads can also control electronic blinds which are also available from Lutron.
Using the recommended Lutron control cable which has two pairs of cables, one pair is for power and the other pair is for signal. Additional keypads and other components can then be linked from one to the other using the QS Link terminal. You can even link a Grafik Eye QS to an Energi Savr Node and have them both on the same system.
The Lutron Grafik Eye is now discontinued as it was too overpriced to keep up with other up and coming smart lighting brands.
Lighting Circuits – Loop In, Loop Out
The favoured way of wiring recessed downlights is using the loop in, loop out method. This is a form of parallel wiring that has one cable (usually twin and earth 6242Y) containing the live, neutral and earth wires looping in and then out of leach light fitting. This is an alternative to the traditional junction box system, it uses less cable and is faster to complete.
Many downlights have a loop in, loop out terminal block attached to them. For example the Ansell iCage has the largest one which was specifically designed for this type of wiring. A popular feature for downlights is push-fit terminals which also have loop in, loop out terminals. Some have them directly attached to the downlight and some come with wiring connectors.
When installing downlights that don’t have their own connection system, many installers create their own by using a Click Flow Connector. With this connector you wire the smaller male connector into the downlight and the corresponding female connector into your loop in, loop out circuit. Then you simply plug the downlight into the circuit and continue the process with the next ones.
Other downlights like the Aurora M Series and Click Ovia Nano are supplied with their own wiring connectors. The male connector is already pre-wired into the downlight so half of the work is already done for you. Another advantage of using Flow Connectors is if the downlight fails you can unplug it and get it replaced yourself without having to get an electrician back in to disconnect it and then reconnect the replacement.
Lighting Circuits – Series Wiring
Series wiring is mainly used with multiple LED lights that are powered from the same LED driver. It is usually used with smaller LED downlights or with LED ground lights that are constant current. The most popular constant current ratings are 350ma or 700ma. This diagram below shows how it's done:
Series wiring example
Although many of the LED downlights we offer are constant current, they are each supplied with their own LED driver with is either directly attached to them or trails behind them like an old fashioned halogen and low voltage transformer combination. If you’re wiring a mains supply into each LED driver individually it would be classed as parallel wiring and can be done using the loop in, loop out technique. Parallel wiring is mainly used with constant voltage lighting products such as LED strip lights.
Wiring a Downlight
If you’re upgrading an existing halogen downlight you’ll most likely either have mains voltage GU10 or low voltage MR16 (GU5.3) halogens. Low voltage halogens will have a transformer; this will need to be disconnected as it will no longer be required. The only reason you'd need to keep the transformer is if you wanted to use MR16 LEDs that operate on AC, this is a less popular option as you need to make sure the existing transformer is compatible with the LEDs and if you're dimming them, you'll need to make sure that the MR16 LED, transformer and dimmer switch are all compatible. Many installers go for the GU10 or integrated option as their are less components to consider and it often costs less.
Hole Cut Out Size
If you're replacing existing downlights you'll want your new ones to have a similar hole cut out size otherwise you'll either need to make the holes bigger or make them smaller (yes I said smaller) which would involve re-plastering your ceiling and re-cutting the holes. Matching the hole sizes is always a key decision in the selection process.
Unless specifically stated downlights are wired in parallel, downlights are only usually wired in series when multiple lights are being powered from the same LED driver. Depending on which type of downlight you choose ,you may need to set provisions to earth them. Here are two examples that explain how to wire a downlight, one is for a GU10 fire rated downlight and another explaining how to wire an integrated LED downlight, each one has it's own earthing provisions:
Wiring a Fire Rated Downlight – Ansell iCage
The Ansell has got a large loop in, loop out terminal block that allows 2x 1.5mm twin and earth cables to wired into one downlight and into the next one. The iCage is supplied with both a GU10 and a GU5.3 low voltage lamp holder.
When used with the GU10 lamp holder, the downlight is mains voltage and must be earthed. This is classified as a Class I product. If you’re using the low voltage GU5.3 lamp holder the downlight is classified as Class III and doesn’t require an earth.
Wiring an Integrated LED Downlight - Halers H2 Pro
Some integrated LED downlights like the market leading Halers H2 Pro from Collingwood Lighting are SELV which stands for Safety Extra Low Voltage. This means that the voltage of the LED driver is below 12V AC or up to 30V DC. Voltages below 20V can’t usually be felt by the human body and are considered harmless.
SELV light fittings don’t require an earth; they are classified as Class III constructed products. The LED driver for the H2 Pro is also double insulated which means it has two layers of insulation around the live components, this also means it doesn’t need to be earthed. The DC output voltage is separated from the AC supply voltage.
The H2 Pro has a live and neutral wire coming off the LED driver, you'll need additional junction or connector blocks to wire them. By adding a Click Flow connector you can create your own loop in, loop out system as mentioned in the previous loop in, loop out wiring section.

Normally transform the power off on the breaker before beginning any electrical challenge. As you’ve turned your electric power off, clear away the switch protect and use a present-day detector to make sure there’s no electric power going to any of your wires from the electrical box. If there’s no power, you’re prepared to proceed to the first step.
To be able to make certain that They are really nicely shielded and stored Harmless in the atmosphere by which They can be put, rocker switches come with a cover.
In line with us, these switches would function very effectively in Neighborhood spaces or in living rooms where you will want vivid lighting Each time consumers are existing.
Up subsequent are selector light switches, which are frequently used to toggle concerning two or maybe more lighting modes. These will allow you to change in between different modes by urgent distinct buttons or rotating a dial.
As opposed to jogging upstairs, Allow the Rolling Stones help you come across the right breaker. Find circuit breakers by plugging a loud radio to the outlet you’re focusing on. You’ll know you might have the proper circuit breaker when the music dies. But don’t suppose the electrical power is off in all another outlets or lights within the place.
If a switch has failed, the switch will have to be replaced and rewired. Fashionable switches usually can be found in two varieties. You will discover switches in which wiring has to be held in position by a screw, and there are ‘plug-in’ design switches wherever wiring is held set up by a sprung thrust-button release mechanism. For improved dependability, we propose utilizing the screw variety of switch plate.
Located in Lancaster, PA. WebstaurantStore is the most important online cafe supply retail store servicing professionals and particular person consumers around the world. With countless A huge number of merchandise readily available and many orders delivered, We've got every thing your organization desires to function at its finest.
Make use of the grounding wire to ground the switch to stop any situations of electrocution. Also, double-Check out Should you have linked the appropriate wires with the right terminals. After you are accomplished,near the switch circuit before you turn back the power.
But if you prefer the vintage version additional, opt for the normal switch, and you may keep toggling it when essential. They are responsible and can final for an incredibly very long time.
Repeat the very same method Together with the loop from your second black wire. Remember to be certain a good connection.
As it is possible to see, wiring a light switch does not have for being intricate. Like another home improvement task, it basically needs a tiny investigation and endurance.
Mainly because they can take care of a large amount of power, they are popularly Employed in industrial configurations and for commercial needs. They're rated at thirty amps and can be employed Despite having large equipment or huge ovens that demand from customers plenty of electric power.
This short article could contain affiliate one-way links, Consequently for free of charge to you, we may well get a small commission for qualifying purchases.
When managing each a plastic switch plate and plastic again box, the Earth wire could be terminated Within the wire’s protecting insulation sleeve and folded in excess of.